")
Once again, China-based Pangu Team has released the jailbreak for iPhone, iPad and iPod touch devices running the previous unsupported iOS 9.3.3 – iOS 9.2. The tool has already been issued and is available for windows operated devices. There is no tool for Mac OS yet, but as always or usually it will be presented shortly.
![]()
Supported iOS 9.3.3 Devices:
Before you download the jailbreak tool, you must know that you cannot use it if you have a 32-bit device. The tool has only been built for 64-bit devices at the moment and if your device is not in the list, you cannot use it:
- iPhone 5S and newer
- iPad Mini 2 and newer
- iPad Air and newer
- iPad Pro
- iPod Touch 6
iOS 9.3.3 jailbreak Tutorial :
How to get iOS 9.2 / 9.3.3 jailbreak on your device. The first technique uses PPHelper from Pangu and needs a PC to do it. Tutorials for the method is covered below.
Before you Jailbreak using PPHelper :
There are a couple of things you must do in order to prepare your device for jailbreaking:
- Make sure your computer is running the latest version of iTunes
-
Back your iOS device up through iTunes and or iCloud
- Disable your passcode
- Disable Find my iPhone
- Disable Touch ID
- Download the tool from Here
- create new Apple ID.
please note that the instructions below are for Chinese version of the jailbreak tool as the English version is not out yet. I will walk you thorough the process.
After the PPHelper Tool for iOS 9.3.2 Jailbreak is downloaded
Step 1. Connect your iOS device to your computer.
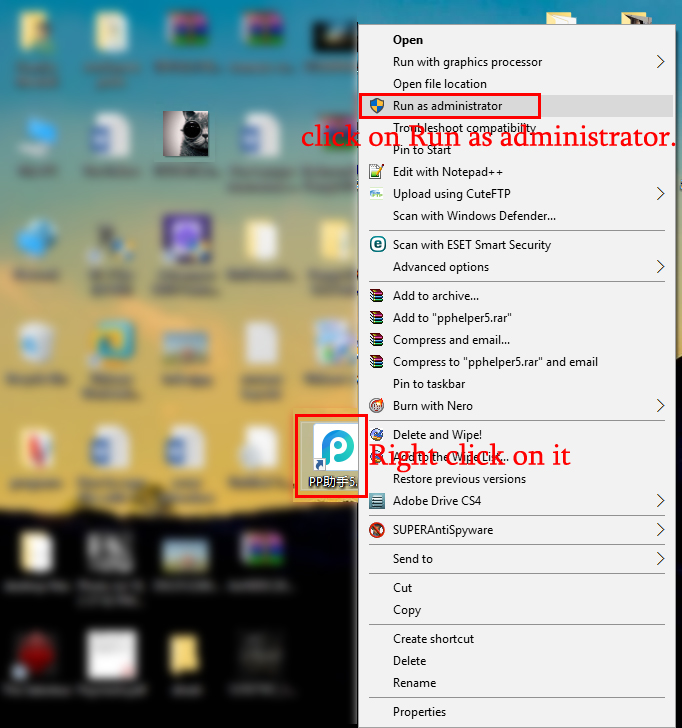
Step 2. Once you have downloaded the jailbreak tool from the link given above, launch it as administrator on Windows by right clicking on the file and then clicking on Run as administrator.

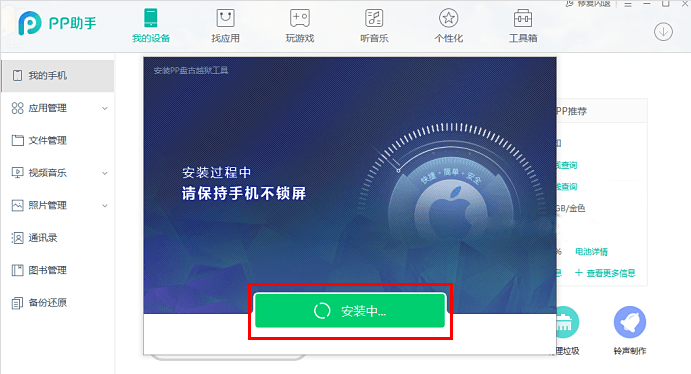
Step 3. Now click on the button which has some Chinese text on it. This will install PP Helper 5.0.

Step 4. You should now have PP Helper 5.0 shortcut on the desktop. Right click on it and then click on Run as administrator.
Step 5. Once it’s launched, Wait for PPHelper to recognize your iOS device.

once done, click the big green button with some Chinese text on it to begin the jailbreak process
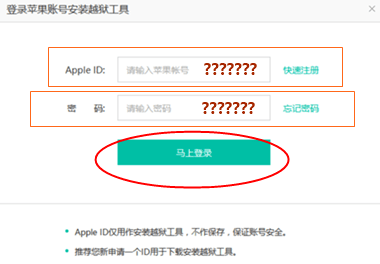
Step 6. You may be asked to input a Captcha code before you can process it. enter the code and hit enter. tool will now start installing a profile on your device.

The tool at this point will require you to enter your Apple ID and password. While Pangu says it doesn’t store any of this information and simply uses your Apple ID to sign the PP app it’s going to install on your device for jailbreaking, I still recommend signing up for a spare Apple ID from https://appleid.apple.com and using that in this step rather than your main Apple ID.
Step 7. PP will start installing on your device now. Once installed, in order to run it, you need to first head to
Settings > General > Device Management (on iOS 9.3.3) or
Settings > General > Profile (on iOS 9.3.2 and below) and then trust the developer.

Step 8. Once done, open this PP app and accept the push notifications.

when the app opens Uncheck the box beside Install PP Assistant

Step 9. Now tap on the big circle in the center, and wait for PP app to install Cydia. Hit the sleep/power button to manually lock your device. You will soon get a notification in Chinese saying that your device has been successfully jailbroken. (also you might see The Storage almost full notification. It is normal and ignore the message.)

Step 10. At this point, simply unlock the device and you’ll be in PP. It will start preparing the device for Cydia. Once done, the iDevice will reboot automatically and you should have Cydia installed.
As mentioned earlier, this is a semi-untethered / tethered jailbreak which means every time the device reboots, you will have to re-jailbreak of sorts to get the device back into jailbroken state.
Fortunately, this doesn’t mean you need to go through the whole process through your computer again. You don’t have to reinstall the jailbreak tweaks, settings or Cydia either. All you need to do after every reboot is to run the PP app from the home screen on your device and tap that large circle button to get back into jailbroken state again within no time.
Fix “failed in buffer_write(fd) (8, ret=-1)” Cydia Error After iOS 9.3.3 Jailbreak:
Unfortunately , the jailbreak tool by Pangu Team for the latest iOS version has one problem (it is observed for some users), and it results in a an error when using Cydia. the error is: failed in buffer_write(fd) (8, ret=-1). the Fix is here already and it’s very easy to use.
Step 1. On your jailbroken device, launch Cydia app and then switch to the Sources tab.

")
Step 2. Hit Edit, then Add and enter the following repository: https://coolstar.org/publicrepo

Step 3. Search for and install the “Stashing for iOS 9.2 – 9.3.3” tweak as shown in the screenshot below.

This fix primarily takes over the handling of wherever tweaks are put in on the device so as to get around existing problems with the scale of certain information areas on iPhones / iPads with specific storage capacities. once complete, Cydia will install tweaks on the iPhone’s or iPad’s data partition, saving valuable space in the process.
Alternate method:
If the above method doesn’t fix your problem, try the following:
Step 1. Install Apple File Conduit “2” on the device from Cydia.
Step 2. Next, install iFunbox and connect your device.
Step 3: Launch iFunbox and click on Raw File System.
Step 4: Now on the right column where files and folders are shown, find and rename the file /.cydia_no_stash to /.cydia_no_stash-
Step 5: Once done, disconnect your device from computer and open Cydia, it should start preparing file system this time.
You can do the above with iFile too instead of iFunbox if you have iFile installed on the device.
