
Please note: during this procedure you’ll lose any data on your USB flash drive. Please be extra careful during formatting, choosing the wrong drive will erase it completely.
you will need
- PC running Windows XP/Vista/7/8/10
- Windows 7, 32/64-bit (depending on the system) installation disk
- USB drive with at least 8GB of free storage
Step 1: Using DISKPART command
Preparing the USB drive:
- Open command prompt as administrator – Right click on Start > All Programs > Accessories > Command Prompt and select (with right click) Run as administrator or type cmd in the Start search bar and Run it admin.
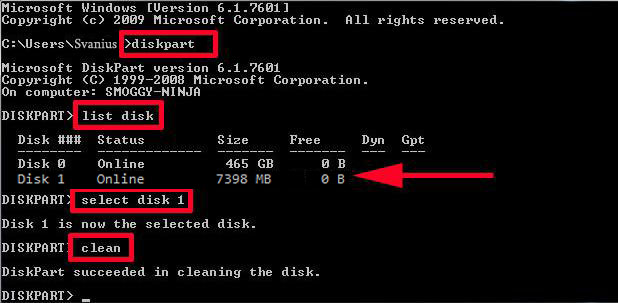
- Run diskpart utility by typing diskpart into command prompt window and pressing “Enter”.
- in opened window type in list disk, it will show list of disk drives on the computer, We’ll assume the USB drive is disk 1 (double check size of the drive to make sure you are working on correct drive)
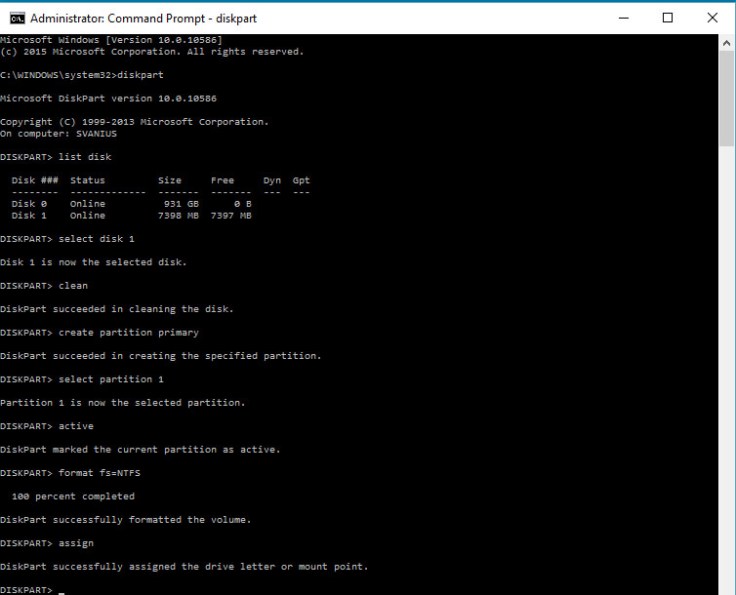
4. Run the following commands:
- select disk “number” (I.E. select disk 1)
- clean
- create partition primary
- select partition 1
- active
- format fs=NTFS
- assign
- exit
(should look like in the image)
Step 2: Creating Boot Sector
Let us assume that the flash / USB drive is the F: drive and the DVD installer located on drive D:. The first step, we will navigate Command Prompt to set installation DVD as its active directory.
- By default, Command Prompt’s active directory for Administrator permission is on C:\Windows\System32>. We will navigate Command Prompt to set on DVD (D:) as its active directory. Just type ‘D:‘ (in command prompt”cmd”) then hit Enter, and the active directory changed to D:.
- Type ‘cd boot‘ and hit Enter. Active directory changed to D:\boot>.
- Type ‘bootsect /nt60 F:‘ and hit Enter. Creating boot sector on F: drive (USB flash drive).
- Type ‘exit‘ and hit Enter to close the Command Prompt. Until this step we have made a bootable USB drive sucessfully, and the flash drive is ready to be used as a boot media
Step 3: Copying Installation Files
To install Windows from a bootable USB drive, we just need to copy the whole installation files contained on the DVD installer to flash drive. To do this, open the Command Prompt as in previous steps. Once it opens, type ‘xcopy D: \ *. * F: \ / E / H / F‘ and then press Enter. Wait until all the files in the DVD installer copied to the flash drive. Now bootable USB drive is ready to be used for installing Windows from flash drive and you’re done

Leave a comment