
Terminal is one of the most powerful tools in Mac OS, that allows any user to overtake standard control and become the Admin of your computer. Terminal, a command line interface (CLI), mostly not used due to lack of knowledge or fear of making mistake. One mistake and entire system can go out. Luckily, there are commands that are quite handy and can be used without big knowledge of Terminal commands or kept for future.
Firs of all, launch Terminal app located in Applications > Utilities , or with use of Spotlight. In Terminal window, copy and paste the commands that looks most interesting or one that you want to try.
Dock – after while we all want some kind of change, or different looks. here is an easy terminal tweak, which allow you to organize the Dock’s many icons by adding in a blank spaces:
defaults write com.apple.dock persistent-apps -array-add ‘{“tile-type”=”spacer-tile”;}’
killall Dock

Repeat the command to add more “blanks” or “spaces”. To remove it, just drag the space out from dock until you see the “poof” icon.
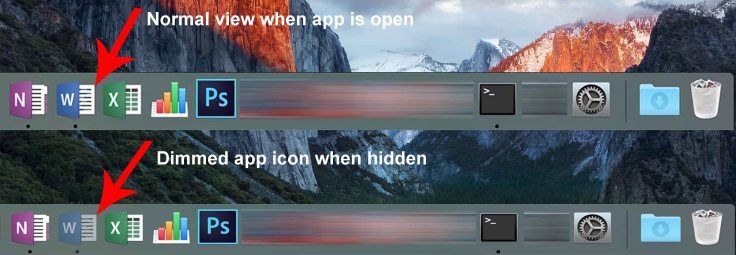
In Mac OS you can move inactive windows or an applications out of the way by minimizing it (Command-M), or by hiding it (Command-H), which keeps it open, but removes all visible windows. To keep track of hidden applications, especially if you’re not using the “Show indicators for open applications” option is to use the small tweak. it lowers opacity on hidden icons in the Dock. It’s a great way to see what you have not used or what is messing up your screen.
defaults write com.apple.Dock showhidden -bool TRUE (return)
killall Dock
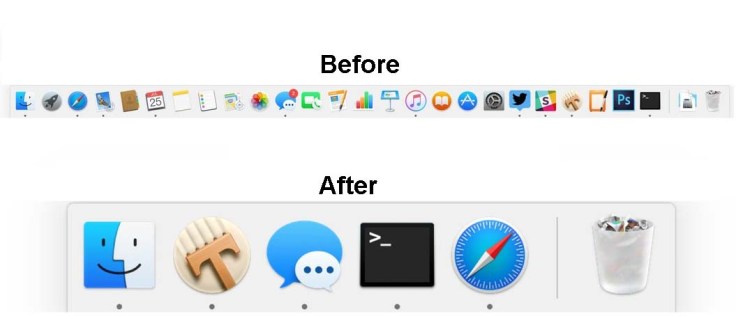
If previous tweak is not good enough and you simply want to Hide non-active apps in your Dock, well then next tweak is for you. It hides the app from your Dock at all times if it is closed.
defaults write com.apple.dock static-only -bool TRUE
killall Dock
Recently Used Apps – Very often we want to have an access to recently used applications without docking them, so next command is very handy, simply copy and paste the command below and it will create a shortcut in your Dock. (To remove it, right click on it and ‘Remove from Dock’).
defaults write com.apple.dock persistent-others -array-add ‘{ “tile-data” = { “list-type” = 1; }; “tile-type” = “recents-tile”; }’; killall Dock

Next is how to show hidden files and folders, if you want to see all the hidden files and folders Mac Os has this very simple command:
defaults write com.apple.finder AppleShowAllFiles -bool TRUE (return)
killall Finder
To hide files again, just change the TRUE to FALSE
How to View any file’s contents – If you had a file that got corrupted or you assume that there is something hidden in its package, you can force Terminal to open it by using command:
cat ~/enter/file/path
FYI: If you’ll try to open a photo or any none text document, most likely you will see some gibberish text. also, If you have a file that is not supported but want to know is inside it, you can use the next command to inspect its contents, it will open everything only MP3’s and video files will be gibberish. This command is very handy when you are trying to recover corrupted files. Just write ‘cat’ followed by path of the file. If you are not familiar how to navigate to the file, just right click the file and ‘Get info’, there you will see the file’s path. Below is an example:
cat /Users/Svanews/Desktop/secret.sv
How to download files outside of your browser
unlike window if you Have the URL to a file but don’t want to use any of the browsers (Safari, Firefox, or Chrome) to download it, You can go through Terminal with the next commands (where “cd ~/Download/” changes the location of terminal and second command downloads to the folder):
cd ~/Downloads/
curl -O http://www.domain.com/filelocation/url.pdf
If you want to Change format of screenshot file, disable shadows, Create a new default name and / or Change the location then next commands will help.
as you know, by default, all screenshots are saved as PNGs, but you can also save them as PDFs, JPGs, and more.
defaults write com.apple.screencapture type jpg
Here’s another good one if you tend to take a lot of screenshots: This command will disable shadow on your screenshots, only showing the window you’ve screen-shoot .
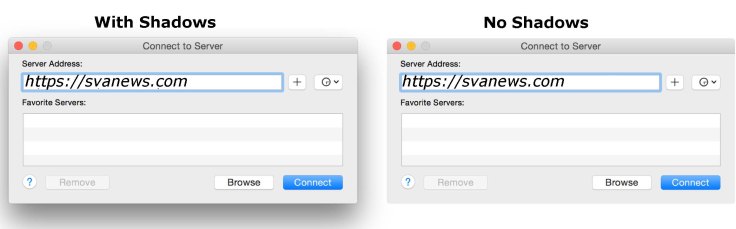
$ defaults write com.apple.screencapture disable-shadow -bool TRUE
killall SystemUIServer
if you don’t like the default name “Screen Shot – [date] – [time]” Apple uses to save your screenshots , you can change the”Screen Shot” to any word you love to.
defaults write com.apple.screencapture name “word of your preference”
killall SystemUIServer`
if you’ll decide to go back to the default, just type follows:
defaults write com.apple.screencapture name “”
killall SystemUIServer
By dedault, Mac saves your screenshots to the Desktop. If you prefer to save them somewhere else, it is an easy trick to make it so.
defaults write com.apple.screencapture location ~/your/location/here
killall SystemUIServer
if you are lazy to manually type the file path, you can drag the folder of your choice to Terminal window after typing “location.
Since we covered some of the easy commands, lets looking for deeper changes to OS.
1. Custom login message for log In
Whether you want to troll your friends or add useful “just in case ” contact information, you can add a message to your login screen with this Terminal command.
sudo defaults write /Library/Preferences/com.apple.loginwindow LoginwindowText “In case of loss, call 555-555-5555 .”
2. How to change the Login Screen Wallpaper Image
First of all download the image and (find large resolution picture of the image you wish to set as the new login screen wallpaper), make sure it matches your screen resolution (google has an option of searching with exact resolution) if not it will resize / stretch the picture to fit the screen.
Open the image into viewer app and save it again as a PNG file by going to File > Save As > and choosing PNG as the file type, when asked name the file :
“com.apple.desktop.admin.png”
and put it on the desktop for easy access. now lets replace the login screen image with your customized one,
Hit Command+Shift+G to bring up Go To Folder and enter the following path:/Library/Caches/
find the file “com.apple.desktop.admin.png” and rename it to “com.apple.desktop.admin-backup.png” or something similar so that you can restore to the default if needed.Now drag and drop the “com.apple.desktop.admin.png” file you saved in the first sequence into this folder. now you can check result by restarting your mack or switching the users.
3. when was last time you restarted your mac?
if your mac is acting strange and sluggish, It might be time to restart it. You can check and see how long your Mac’s been active with this command:
uptime
4. Keep your Mac awake
If you need your mac to not sleep — lets say, you are running a task that does not require your presence but need mac to be on, or if you are recording your screen — there is a command for it:
caffeinate

with the command, your Mac will be awake until you end its insomnia by pressing Control-C.
If you want to set time, after when Mac can go to seep, then you can set a number of seconds before your Mac sleeps:
caffeinate -u -t 10800
The above command will keep your Mac awake for three hours.

Leave a comment