

Learn how to solve specific iOS update and restore errors.
Find your error number
If you tried the basic steps and still see the error message, click your error number and follow the advanced steps below.
| 1, 2, 3, 4, 6, 9, 10, 11, 12, 13, 14, 16, 17, 20, 21, 23, 26, 27, 28, 29, 34, 35, 36, 37, 40, 53, 56 |
| 1002, 1004, 1011, 1012, 1013, 1014, 1015 |
| 1600, 1601, 1602, 1603, 1604, 1611, 1638, 1643-1650, 1667, 1669 |
| 2001, 2002, 2005, 2006, 2009, 3002, 3004, 3013, 3014, 3015, 3194, 3200 |
| 4005, 4013, 4014, 9006 |

Solve network errors
Errors: 17, 1638, 3014, 3194, 3000, 3002, 3004, 3013, 3014, 3015, 3194, 3200. You might also see these alert messages:
- “There was a problem downloading the software.”
- “The device isn’t eligible for the requested build.”
These alerts mean that your computer is either having difficulty contacting the Apple update server or communicating with your device.
Check your computer for software or settings that might cause communication issues between your computer and Apple or between your computer and your device.
(Check your hosts file
After you update iTunes to the latest version, check the hosts file to make sure your computer can contact the update server.
Windows
If you’re using a Windows computer, follow the steps from the Microsoft support site. Resetting the hosts file affects software services that rely on hosts file redirects. If you’re using Windows on a business computer, consult your IT department to be sure applications work correctly after you reset your hosts file.
Mac
If you’re using a Mac, follow these steps:
1. In the Finder, choose Applications > Utilities.
2. Open Terminal.
3. Type this command and press Return:
sudo nano /private/etc/hosts
4. Enter the password you use to sign in to your computer and press Return. You won’t see text appear in the Terminal window when you type your password.
5. Terminal displays the hosts file. If you don’t see a window similar to the one below, make sure you’re using a nonblank administrator password.
6. Navigate using the arrow keys and look for an entry containing “gs.apple.com”.
7. Add the # symbol and a space (“# “) to the beginning of the gs.apple.com entry.
8. Press Control-O to save the file.
9. Press Return when asked for the filename.
10. Press Control-X to exit the editor.
11. Restart your Mac.)
If you still see the error message, check your security software.
Check your security software
Errors: 2, 4, 6, 9, 1611, 9006.
Sometimes security software can stop your device from communicating with either the Apple update server or with your device.
Check your security software and settings to make sure that they aren’t blocking a connection to the Apple servers. (Before changing your security software’s setup:
- Make sure that the date, time, and time zone are set correctly on your computer.
- Log in to an administrative user account, not a guest account.
- Make sure that you have the latest version of iTunes.
- Update OS X or Windows.
- Update your security software. )
Check your USB connections
Errors: 13, 14, 1600, 1601, 1602, 1603, 1604, 1611, 1643-1650, 2000, 2001, 2002, 2005, 2006, 2009, 4005, 4013, 4014. You might also see a message that includes “invalid response.”
If the USB connection between your device and computer is interrupted, you might not be able to update or restore.
To narrow down the issue, try different equipment:
- Use the USB cable that came with your device, or a different Apple USB cable.
- Plug your cable into a different USB port directly on your computer. Don’t plug it into your keyboard.
- Try a different computer.
- Solve other issues with the USB connection, then with your security software. (If there’s an issue with the USB connection to your device, you might see an alert message like “iPhone has timed out” or “error 9” or your device might unexpectedly disconnect when syncing.
If you’re having issues using your iPhone, iPad, or iPod touch with iTunes, the USB communication to your device might not be working properly. Use the steps in this article if your device disconnects during syncing or you see one of these alert messages: - “iPhone has timed out” when syncing
- An unknown error occurred when syncing
- The USB device can’t operate because it needs more power
- “This device can perform faster” if you use a higher speed USB port
- iTunes error 9 or error 2001–2011 while updating or restoring)
If you still see the error message, check for hardware issues.
Check for hardware issues
Errors: 1, 3, 11, 12, 13, 14, 16, 20, 21, 23, 26, 27, 28, 29, 34, 35, 36, 37, 40, 53, 56, 1002, 1004, 1011, 1012, 1014, 1667, or 1669.
Your device or computer might have a hardware issue that stops the update or restore from completing.
- Check that your security software and settings aren’t blocking your device from communicating with the Apple update server.
- Then try to restore your iOS device two more times while connected with a cable, computer, and network you know are good.
- Make sure that your security software and settings are allowing communication between your device and update servers.
- If you still see the error message when you update or restore, contact Apple support.
If you still see the error message, check for outdated or modified software.
Check for outdated or modified software
Errors: 1015. You might also see the message “The required resource can’t be found.”
These errors might appear if any of the situations below are true:
- Your version of iTunes is out of date. Get the latest version of iTunes, then try to update or restore again.
- Your device has a beta version of iOS.
- You’re trying to install an earlier version of iOS (downgrading).
- Your device has unauthorized modifications to iOS, also called “jailbreaking.”
iOS is designed to be reliable and secure from the moment you turn on your device. Built-in security features protect against malware and viruses and help to secure access to personal information and corporate data. Unauthorized modifications to iOS (“jailbreaking“) bypass security features and can cause numerous issues to the hacked iPhone, iPad, or iPod touch, including:
Security vulnerabilities: Jailbreaking your device eliminates security layers designed to protect your personal information and your iOS device. With this security removed from your iOS device, hackers may steal your personal information, damage your device, attack your network, or introduce malware, spyware or viruses.
Instability: Frequent and unexpected crashes of the device, crashes and freezes of built-in apps and third-party apps, and loss of data.
Shortened battery life: The hacked software has caused an accelerated battery drain that shortens the operation of an iPhone, iPad, or iPod touch on a single battery charge.
Unreliable voice and data: Dropped calls, slow or unreliable data connections, and delayed or inaccurate location data.
Disruption of services: Services such as Visual Voicemail, Weather, and Stocks have been disrupted or no longer work on the device. Additionally, third-party apps that use the Apple Push Notification Service have had difficulty receiving notifications or received notifications that were intended for a different hacked device. Other push-based services such as iCloud and Exchange have experienced problems synchronizing data with their respective servers.
Inability to apply future software updates: Some unauthorized modifications have caused damage to iOS that is not repairable. This can result in the hacked iPhone, iPad, or iPod touch becoming permanently inoperable when a future Apple-supplied iOS update is installed.
Use recovery mode to restore your device to the latest version of iOS:
Put your device in recovery mode and set it up again
- Connect your device to your computer and open iTunes. If you don’t have a computer, borrow one from a friend or go to an Apple Retail Store or Apple Authorized Service Provider for help.
- While your device is connected, force restart it: Press and hold both the Sleep/Wake and Home button for at least 10 seconds, and don’t release when you see the Apple logo. Keep holding until you see the recovery mode screen.
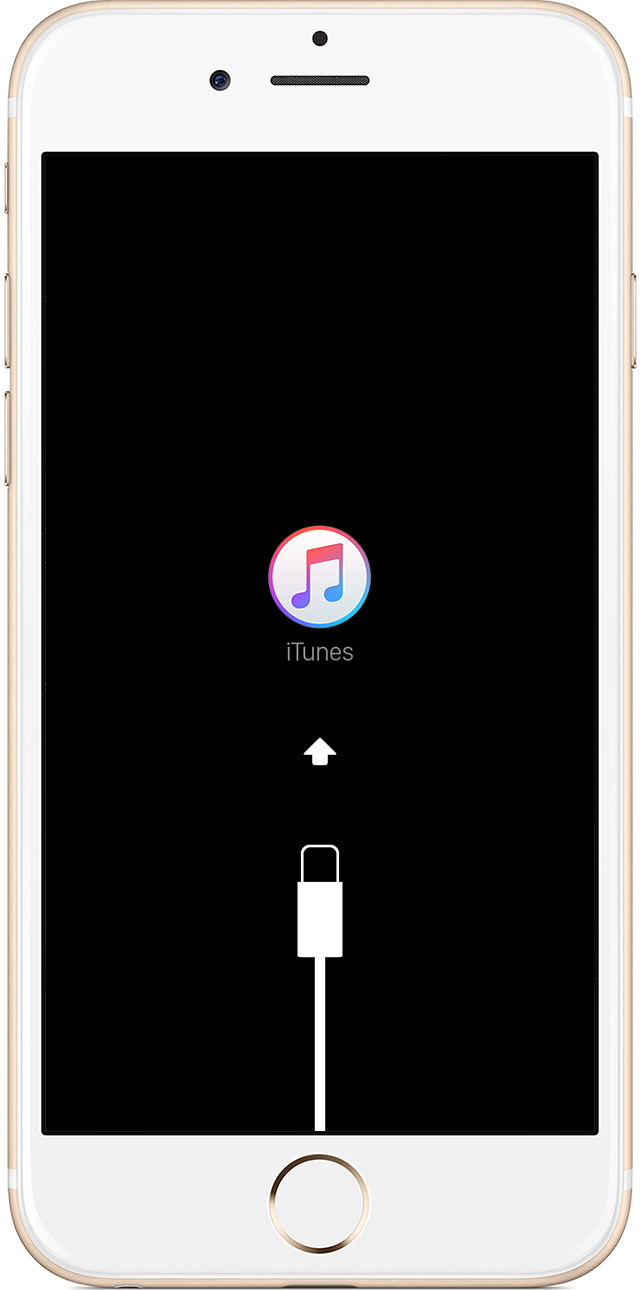
- When you see the option to Restore or Update, choose Update. iTunes will try to reinstall iOS without erasing your data. Wait while iTunes downloads the software for your device.
If the download takes more than 15 minutes and your device exits recovery mode, you’ll need to repeat these steps and choose Restore instead of Update when you get back to this step.
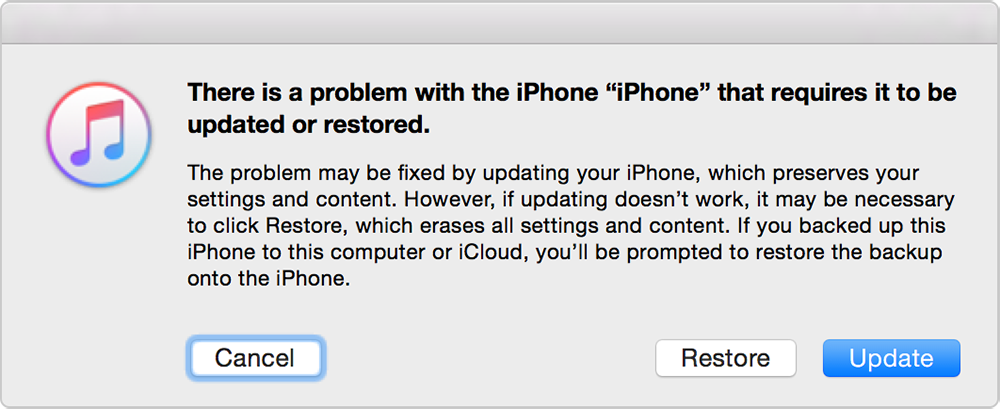
- After the Update or Restore completes, set up your device. If you previously backed up your device with iTunes or iCloud and had to restore your device in step 3, you might be able to restore from your backup during setup.

Leave a comment